NGINX Web App Deployment for DevOps

NGINX is a popular web server that is known for its high performance and scalability. If you're looking to deploy a web application, NGINX can be a great choice. Its ability to act as a reverse proxy and handle SSL termination makes it a popular choice for many web applications. In this blog post, we'll walk through the steps for deploying a web application on NGINX.
NGINX Technical Specifications
NGINX is a powerful open-source web server and reverse proxy software that is designed for high performance, scalability, and flexibility. It is highly configurable, supports a wide range of web technologies and protocols, and offers a range of features including load balancing, caching, SSL termination, and security. Its event-driven, non-blocking I/O architecture allows it to handle a large number of concurrent connections with low resource usage, making it well-suited for high-traffic websites and large-scale deployments.
Step 1: Create AWS instance.
Log in to the AWS account and create an ec2 server.
Nginx is a web server that will serve you static web files. So we require a server.
- Create an EC2 instance and name it 'nginx-project-demo'. Also, don't forget to allow HTTP and HTTPS traffic.
( For sake of practice, let's select an Ubuntu machine with t2.micro instance type)Update your server using the command.
sudo apt-get update
Step 2: Install NGINX
- Now install Nginx using the command below.
sudo apt install nginx
- Check the status of nginx.
systemctl status nginx
- Restart the nginx server with root user permission.
sudo systemctl restart nginx
- To check further nginx is successfully installed on your server is to use the server IP and paste it into the browser URL. The below page will open. (default port will be 80 always)

Step 3: Install docker and create a Container for note-app.
Login to GitHub.
Copy the repository from the below GitHub link
https://github.com/udaybambal/django-notes-app.git
- Now clone this repository in the ubuntu server
git clone https://github.com/udaybambal/django-notes-app.git
Build the app.
- To build the app we need Docker installed on the server.
sudo apt install docker.io
- To set usermod permissions for docker use the command and reboot the server.
sudo usermod -aG docker $USER
sudo reboot
- Switch to the 'django-notes-app' folder and build the app.
docker build -t notes-app .
- Create a container
docker run -d -p 8000:8000 notes-app:latest
Now your application is running on port 8000. As a DevOps engineer, I don't want to expose my public IP on 8000. Instead, run it through the reverse proxy.
Step 4: Set up a reverse proxy.
On folder path '**/etc/nginx' all the Nginx installation and configuration files are present. In layman's language, all the engine parts are located here.

Three files are important here and you must know.
'nginx.conf '- Nginx file containing settings that control its behavior and how it handles incoming requests.
'sites-available' - Directory in the Nginx web server that contains configuration files for individual websites or virtual hosts.
'sites-enabled' - This directory has symbolic links to active sites' configuration files in the sites-available directory and gets deployed...
- Switch to the 'sites-enabled' folder and edit the 'default' file.

- Under 'location' write the command to pass a proxy as shown.
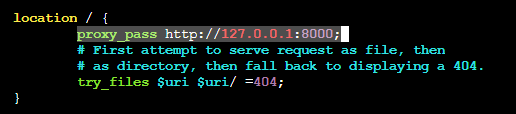
- Now restart the Nginx server for changes to take effect.
sudo systemctl restart nginx
React app page will be displayed using your public IP.
Step 5: Copy the code to the root folder.
As Nginx is now ready for deployment of our web application. We will copy all of our source code to the nginx root folder '/var/www/html/'.
- Path of our source code is 'django-notes-app/mynotes/build/'

We need to copy all these files to nginx root folder.

- Now refresh the browser and you will get an application UI page.

Step 6: Connect the database
Here API route is missing. In other words, the database is not connected.
- For this, we need to add proy_pass to '/etc/nginx/sites-enabled/default ' file as 'location /api { proxy_pass http:// 127.0.0.1:8000/api ;}
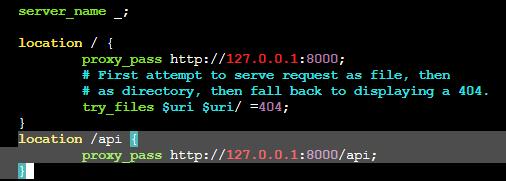
Again Restart the Nginx server for changes to take effect with 'sudo systemctl restart nginx' command and refresh the browser with the IP address as server url.
Now try adding notes in the database.
Also, we can run this app using DNS.
Conclusion:
Nginx is a powerful and popular web server and reverse proxy that can be used to efficiently serve web content and handle high traffic loads. Its modular architecture and extensive configuration options make it highly customizable and adaptable to a variety of use cases.
Nginx is known for its excellent performance and scalability, which makes it a top choice for serving static content, load balancing, and caching. It also has robust security features and can be easily integrated with other tools and technologies such as SSL/TLS encryption, HTTP/2, and Docker.
Overall, Nginx is a reliable and flexible web server that can provide significant benefits to websites and web applications of all sizes.